

Getting Diagnostic Help
- First, check with your state diagnostic clinic about the possibility of distance diagnosis. Sending in a series of good quality digital pictures to a diagnostician can be an effective way of identifying the problem when signature symptoms/signs are present. Find your clinic»
- When the plant problem can’t be diagnosed with certainty from the pictures, diagnosticians can use the images to guide on-site sampling of plant material needed; additional information needed; and whether or not soil or plant samples for nutrient analysis might be needed.
- When collecting plant samples, choose those that are in varying stages of decline. Do not submit dead plants. Badly damaged specimens are often unidentifiable and additional sample requests can cause delays. Be sure the specimens represent the problem. Include enough plant material to show all stages of the disease from healthy to very sick. For virus tests, be sure to send green, symptomatic leaves.
- Send several whole plants, roots and all. Dig roots, rather than pull. The larger the sample size, the better the chance for an accurate diagnosis.
- Include a cropping history, the pattern and distribution of symptoms in the field and % of plants affected. Include photos of the fiield, if possible. Some diseases tend to be distributed in a characteristic pattern and digital images help assist with diagnosis.
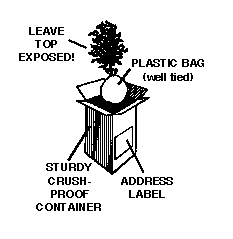
- Packaging a sample. Drawing courtesy of Purdue University, Plant and Pest Diagnostic Clinic.Include other information: description of the soil, nearby plants, and a history of the problem. Incomplete information or poorly selected specimens may result in an inaccurate diagnosis. Most clinics have an Information Request Form to include with the sample. You can print these out from the clinic website. Find your clinic»
- Wrap specimens in paper towels or clean newspapers. Do not add moisture. Pack loosely in a plastic bag to reduce drying. Keep specimens cool and, if possible, ship the same day.
- For mailing or shipping, use strong containers like corrugated boxes or mailing tubes that will not crush in transit. Fill empty spaces in mailing cartons with crushed or shredded paper to protect the specimen.
- Use overnight mail services or mail packages early in the week to avoid weekend layovers at the post office. Careful packaging and quick delivery of the specimens is essential.
- Most clinics request payment with each sample. Make checks payable to the University where the clinic is located. You can find out the fee by checking the clinic website. Find your clinic»


